

Professional
Burp Collaborator
-
Last updated: March 31, 2025
-
Read time: 4 Minutes
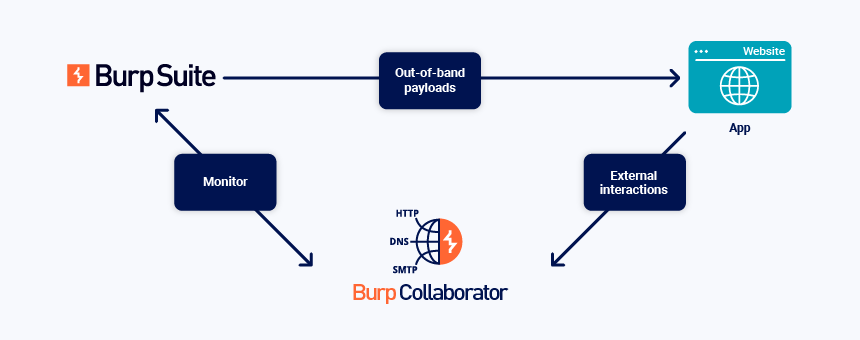
You can manually use Burp Collaborator to induce your target application to interact with the external Collaborator server, and then identify that the interaction has occurred. This enables you to search for invisible vulnerabilities, which don't otherwise send a noticeably different response to a successful test attack.
Note
Automated Burp Collaborator functionality is used by Burp Scanner and some BApps in both Burp Suite Enterprise and Burp Suite Professional. For more information, see the Burp Collaborator documentation for both Burp Suite Professional and Burp Suite Enterprise. This documentation also covers:
The general process for manual use of Burp Collaborator is:
- Generate Collaborator payloads, which are subdomains of the Collaborator server's domain.
- Insert the payloads into a request and send the request to the target application.
- Poll the Collaborator server, to see whether the application uses the injected payload to interact with any network services.
Generating payloads
You can directly insert Collaborator payloads into any request that is open in Burp Repeater. Right-click on the request and select Insert Collaborator payload.
You can automatically insert Collaborator payloads into a Burp Intruder attack. For more information, see Payload types - Collaborator payloads.
You can also generate multiple payloads at once in the Collaborator tab:
- Enter the number of Collaborator payloads that you want to generate in the Payloads to generate field.
- To include the full Collaborator server address in your payloads, select Include Collaborator server location. If this is not selected, only the Collaborator ID is included in your payloads.
- Click Copy to clipboard to copy the specified number of payloads.
- To access the payloads, paste them into a document.
When you send the payloads in a request, the application may perform a DNS lookup on the payload subdomain. It may then initiate another network connection, such as a HTTP or SMTP request. The interactions are received by the Collaborator server: they may indicate that the application is vulnerable.
Note
We periodically add new domain names for the public Collaborator server to reduce the chance of WAF blacklisting, which results in false negatives. By default, Burp Collaborator uses the domain in use when your version of Burp Suite Professional was released.
Currently, the domains in use are *.burpcollaborator.net or *.oastify.com. Make sure that your machine and target application can access both these domains on ports 80 and 443.
Viewing results
You can view whether any interactions were received by the Collaborator server in the Collaborator tab. Burp automatically polls the Collaborator server for results every 60 seconds. To poll manually, click the Poll now button. The number of unread interactions is displayed on the Collaborator tab label, making it easy for you to see interaction counts at a glance.
Results are displayed in the table. You can perform the following actions to analyze the results:
- Filter the table - To filter the table by network protocol, click the HTTP, DNS, and SMTP buttons.
- Search the table - Click Search and enter an expression.
- Annotate interactions - Right-click any interaction and select Comment or Highlight.
- Mark interactions as read - Select the desired interactions then right-click and select Mark as read.
You can also customize and sort the table contents. For more information, see Customizing Burp's tables.
You can track interactions from different payloads in separate tables. To do this, generate Collaborator payloads in different result tabs. Each tab only displays the results of payloads that it generated. All tabs share the same polling schedule, so the load on the server doesn't increase.
Note
If you insert Collaborator payloads into a request with Burp Intruder, the results are only shown in the attack results window. You won't be able to view the results in the Collaborator tab. Save the attack to view the results in the future.
Exporting results
You can export Collaborator interactions as a CSV file to easily share them with others or include them in your reports.
To export all interactions:
-
Right-click the table then select Export as CSV.
-
If necessary, choose a directory.
-
Enter a filename and click Save.
To export specific interactions:
-
Select the interactions that you want to export.
-
Right-click and select Export as CSV.
-
If necessary, choose a directory.
-
Enter a filename and click Save.
When exporting entries in CSV format, Burp represents data as follows:
-
Date times are formatted as:
yyyy-MMM-dd HH:mm:ss.SSS. -
DNS queries and HTTP interactions (including requests and responses) are represented as Base64 encoded strings.